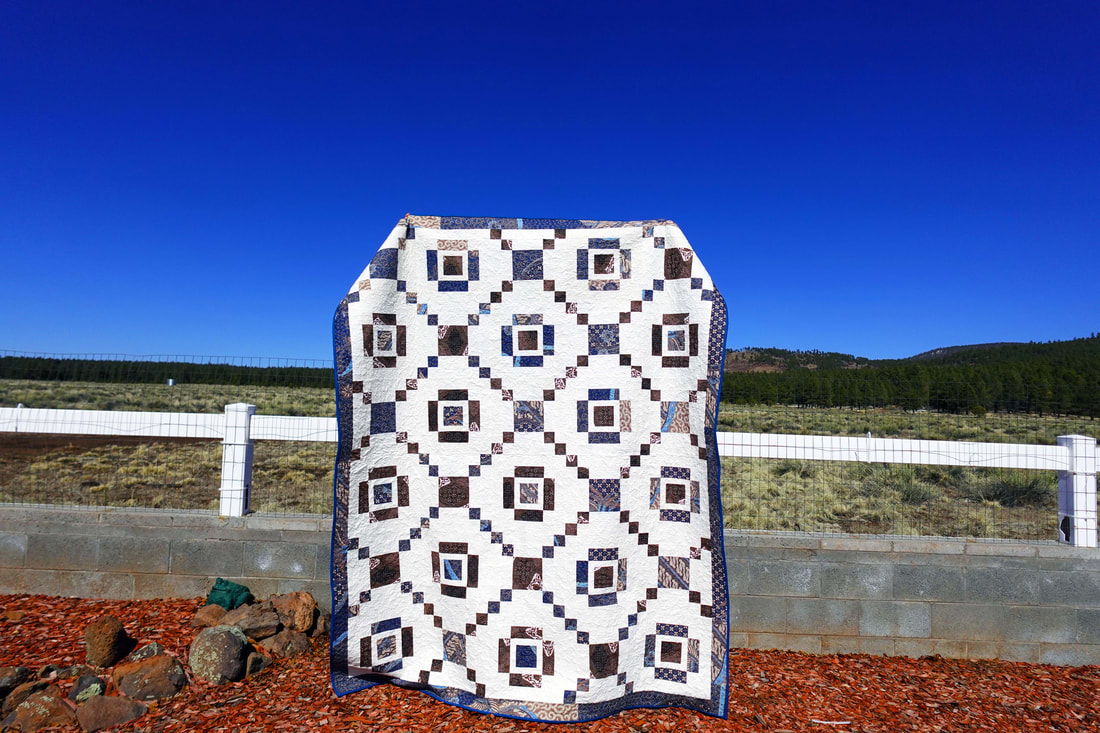
 Solo Quilt by YoanSewingStudio The Solo Quilt is a great project to highlight 1 or 2 fabrics that have rich pattern, intricate design, bold colors or a particular theme.
Finished quilt measurements : 73" x 86 1/2" Block measurements : 14" x 14"
0 Comments
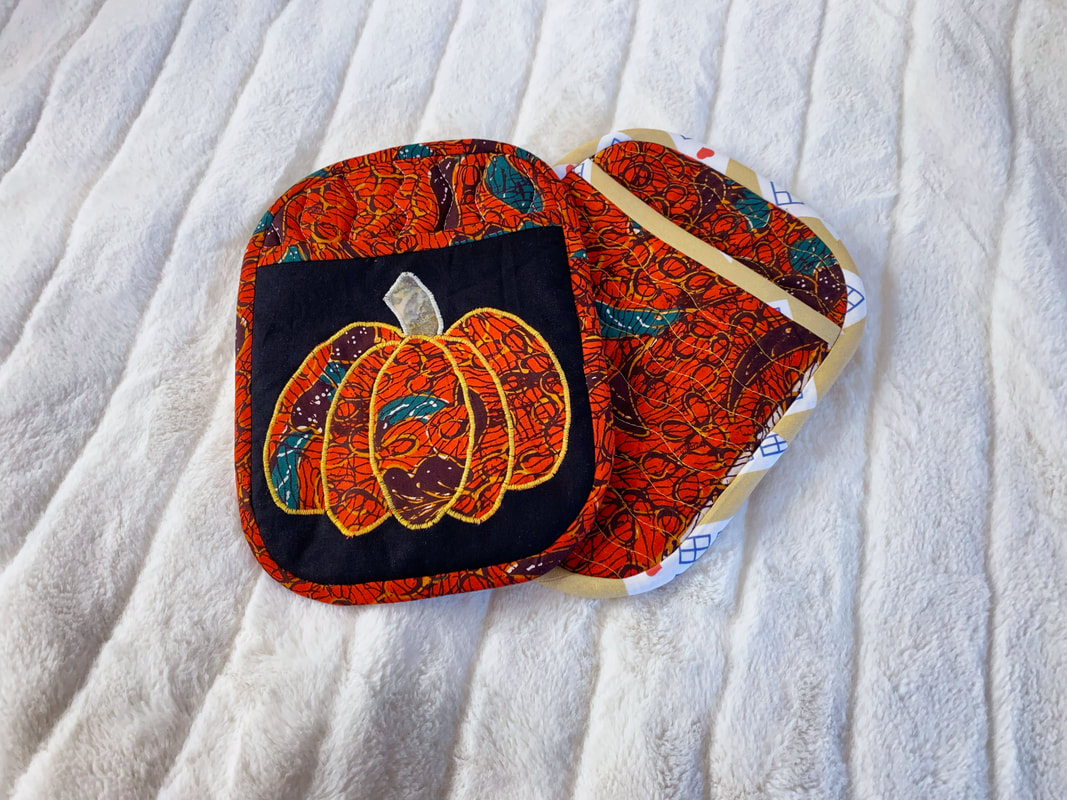 You will adore these potholders to complement your kitchen this autumn season. The pumpkin appliqué is too adorable and so much fun to make. The solid version option allows you to create these in any theme/color, for any season. I can't wait to make few for Christmas too :)
Finished measurements : approx. 7 1/2" x 10" (19 x 25.4 cm). Download the pattern (free) by clicking the button below ⬇️ 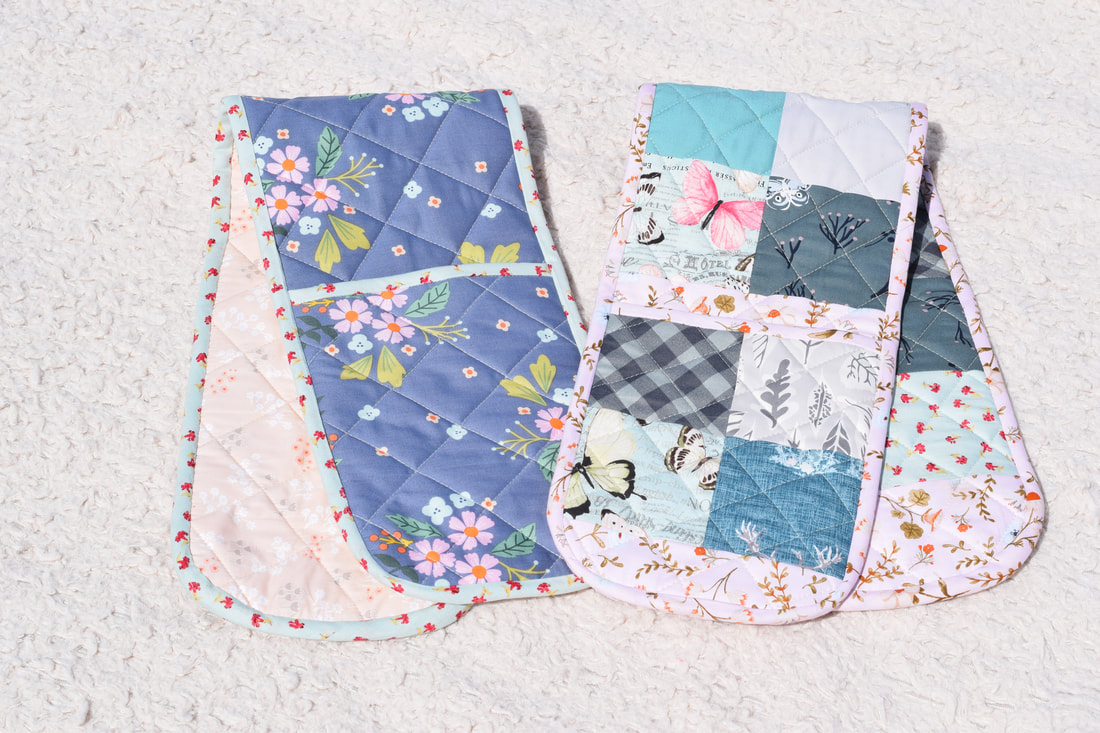
double oven mitts by yoansewingstudio
Today I'd like to share this fun double oven mitts "quilty" project. These oven mitts are not only very functional in protecting your hands from the heat, they're also adorable, and will brighten up your kitchen.
These will work great especially for handling larger stuffs such as pizza stone, casserole dish, cookie sheet, etc. Make one or several for yourself, and for gifting purpose too :). Finished measurements : approx. 34 1/2" x 7 1/2" (88 x 19 cm)
I created two versions of this project, the first version is the patchwork version (a great way to use up some of your fabric scraps, or leftover fabric from previous project). The second version is the "solid" version, same dimensions but without the patchwork.
In the video tutorial I also show you how to make your own bias tape for binding the oven mitts. This post may contain affiliate links. Commission earned when you make a purchase through any of these links with no additional charge. Thank you for your support.
What you need to make the Double oven mitts
For the patchwork version you will need 32 pieces of 4" (10.2 cm) squares, and about 1/2 yard of cotton quilting fabric. For the solid version you will need about 1/2 yard of cotton quilting fabric (main fabric), and about 1/4 yard of cotton quilting fabric for the backing fabric. 34 1/2" x 15" (88 x 19 cm) insulated batting 34 1/2" x 7 1/2" (88 x 19 cm) 100% cotton batting
Watch the full video tutorial on my Youtube channel and remember to subscribe so you won't miss any future upload.
I hope you enjoy this tutorial, happy sewing!
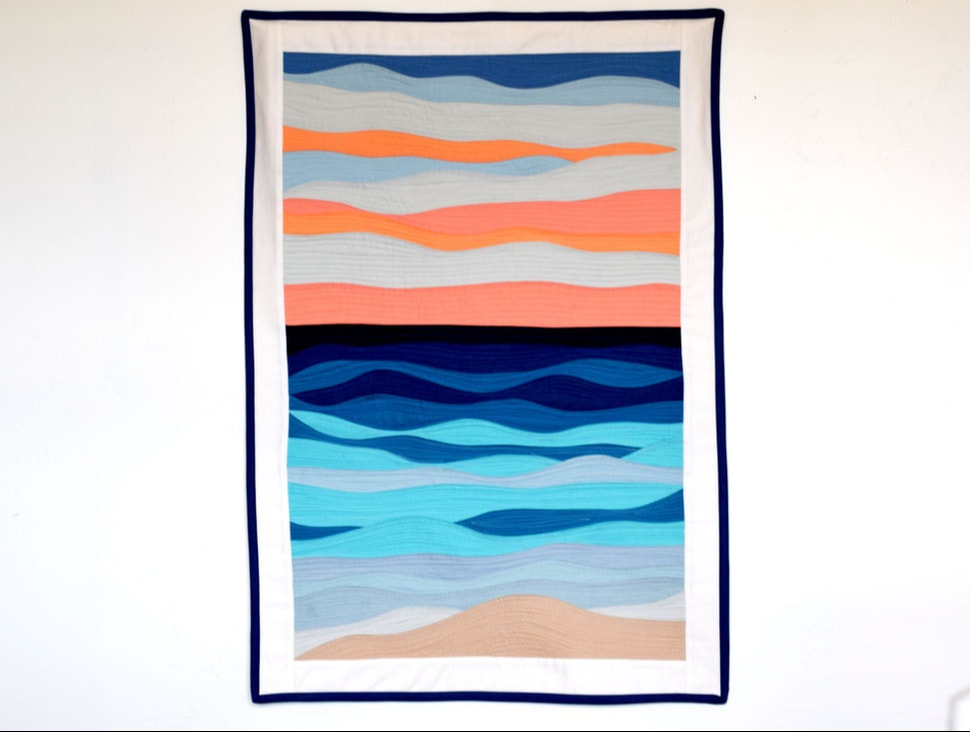
Seaside - Improv wall hanging quit by yoansewingstudio
Learn how to do freeform curve improv piecing in this fun wall hanging project, featuring the seaside with sunset sky theme.
Finished wall hanging measurements : approx. 21" x 30" (53 x 76cm).
This post may contain affiliate links. Commission earned when you make a purchase through any of these links with no additional charge. Thank you for your support.
I can never get enough of the improv quilting. It is the kind of project that I do when I'm experiencing creative block. I simply love the liberating, no hard rules, no precise measurements to follow along, and the one of a kind result of each piece, that always brings a smile on my face.
There are different kinds of improv piecing, which can be incorporated to many different projects, but what I'm going to show you today is the freeform curves. This method is similar to the modern wall hanging quilt project that I shared a couple of years ago; in that video I used some jelly roll strips, and arbitrary piece each strip without much of a planning.
This time, we're going to stick to a theme which is the seaside or beach landscape. The choice of color shades is rather intentional, compare to the former, yet it is also so much fun. What you need to make the seaside improv wall hanging quilt
FABRIC
Solid fabric in various shades color to create the sunset and the water effect, about 1/8-1/4 yard each, or yo may also use fat eight. I ended up using 5 shades of color for the sky (upper section), and 8 shades of color for the water+sand (lower section). You may use less or more color shades depending on the look that you want to achieve. Beside solids, batik fabric will also work beautifully for this project. 1/6 yard of border fabric. 1/4 yard of binding fabric 23" x 32" Batting 25" x 34" Backing fabric
Watch the full video tutorial on my Youtube channel, and don't forget to subscribe so you won't miss any future upload.
Check out my other projects featuring improv piecing in this playlist.
Please enjoy, and happy sewing. 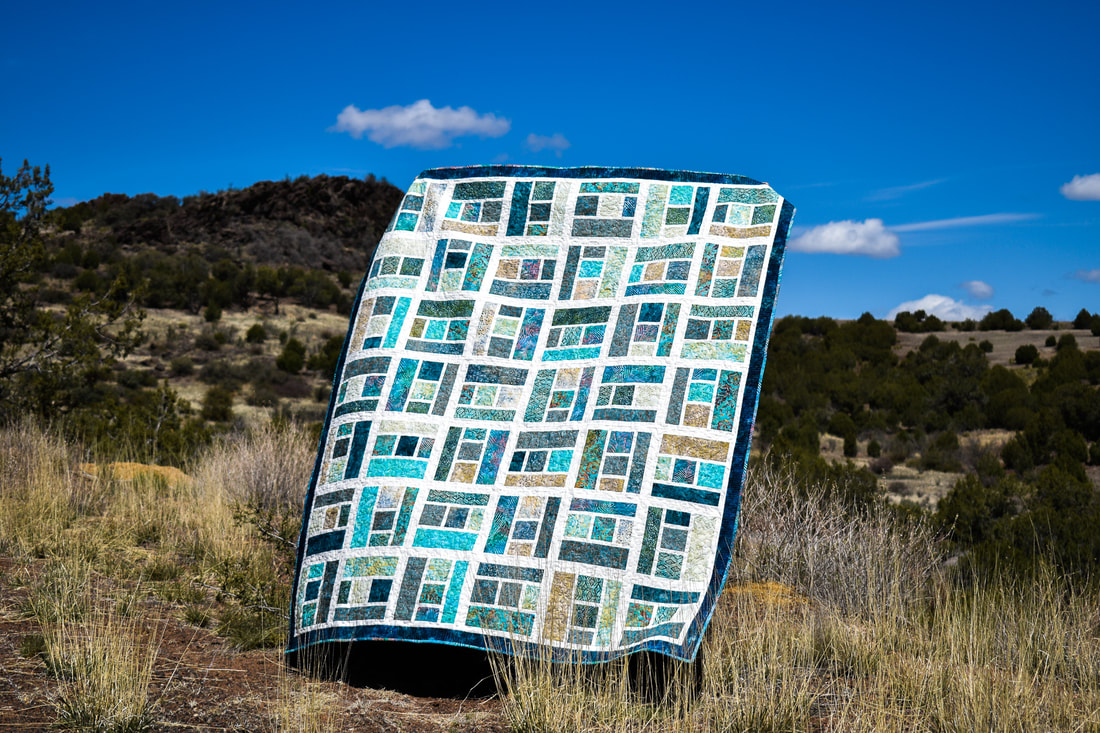
The Island Path Quilt by Yoan Sewing Studio
Make this charming quilt using a set of layer cake (pre cut 10" square fabrics). The Island Path quilt is such a lovely, pretty large in size, yet relatively simple to create. Finished quilt measurements : 66 1/2" x 81 1/2" (179 x 207 cm) Block measurements : 11 1/2" x 11 1/2" (29.2cm x 29.2cm)
This post may contain affiliate links. Commission earned when you make a purchase through any of these links with no additional charge. Thank you for your support.
What you need to make this quilt
Layer Cake 1 full set of layer cake or 42 pieces of 10" squares. I use batik layer cake fabrics, but you can use any theme/colors that you desire. 2 1/3 yard of background fabric I use Kona fabric in off-white color. 5/8 yard border fabric I opt for narrow border for this quilt (2 1/2" wide), feel free to make wider border (adjust the measurements and the amount of fabric needed accordingly). 72" x 83" batting Choose any batting that you like. I personally prefer 100% cotton batting, which is light and easy to work with. 4 1/2 yard backing fabric 5/8 yard binding fabric Machine quilting thread (if opt machine quilting) Basic sewing /quilting notions What can I use instead of layer cake? You may cut individual pieces of each fabric panel according to the listed measurements. Fat quarters, yardage, even fabric scraps will work (the amount of fabric that you need may vary depending on how many variation of each fabric that you use). What fabric line did you use for this project? I mixed different lines of batik fabric for this project, most of the pieces are from the layer cake, and some I cut individually from yardage. I would say that most of them are Indonesian Batik.
Share what you make with this pattern or any pattern that I posted in this website by tagging me in Instagram or use #yoansewingstudio, or you may post directly on my Facebook Page.
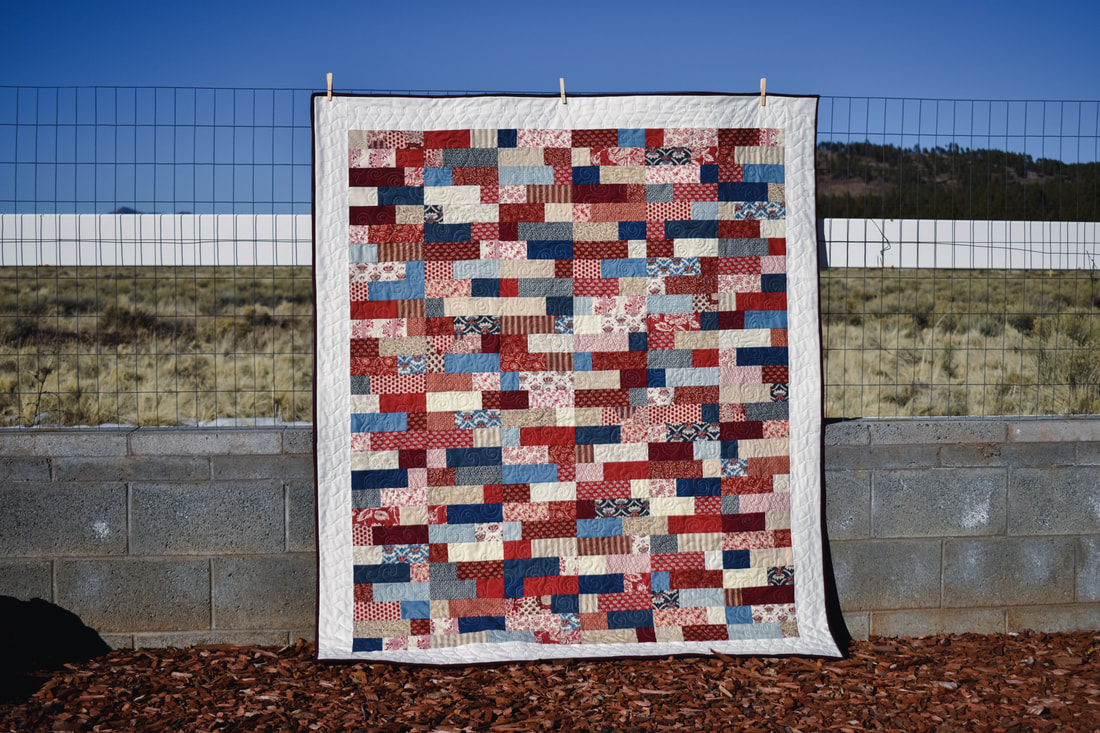
Brick Work Quilt by Yoan Sewing Studio
The brick-work quilt is my another take on the beloved Jelly Roll strips. If you are looking for a fun, yet simple pattern to utilize these lovely fabric strips, this pattern may be just for you.
Finished Quilt Measurement : 55 1/2" x 63 1/2" (141 x 161 cm) Block measurements : 8 1/2" x 8 1/2" (21.5 x 21.5 cm)
This post may contain affiliate links. Commission earned when you make a purchase through any of these links with no additional charge. Thank you for your support.
What you need to make this quilt 42x Jelly roll strips - 2 1/2” x 44“ (6.4 x 111 cm) strips 1x full bundle of jelly roll strips should suffice for this project, however each manufacturer may vary in the amount of strips given in a package, (somewhere between 38-45 strips). If yours is less than 42 pcs, cut few extra strips in neutral colors to get the required amount. 2/3 yard border fabric I use Kona fabric in off-white color to pull this quilt together 58” x 66”(147 x 168 cm) batting use batting of your choice, I always prefer cotton batting since it's breathable and easy to work with 3 1/2 yard backing fabric 1/2 yard binding fabric Note: yardage requirements are estimated, based on standard 44” wide cotton quilting fabric. Machine quilting thread (if opt machine quilting) Basic sewing /quilting notions
What fabric did I use to make this quilt?
I did mix and match several fabric lines, gathering leftover and half opened jelly roll strips that have been accumulating in my stash. Although I would guess about 60% of the fabrics are from French General by Moda Fabrics.
Please watch the full video tutorial on my Youtube channel, and happy quilting.
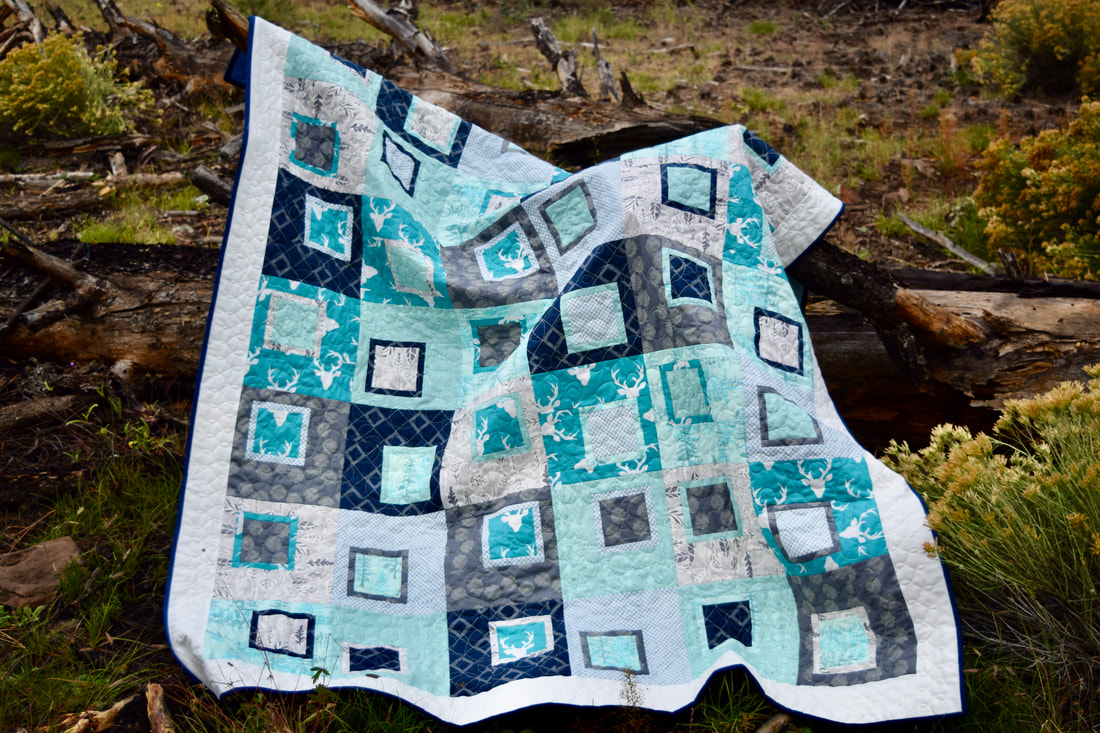
double square in a square quilt by Yoan Sewing Studio
The Double square in a square quilt project is a fresh, modern style quilt, inspired from the Modern square in a square quilt that I shared a while back. This time though, the pattern called for 7x half-yardage, instead of the pre-cut layer cake.
Finished quilt measurements : Approximately 57 1/2" x 66" (throw size). Finished block : 9" x 9"
Follow me on Youtube, and subscribe so you won't miss any upload.
Disclosure : This post contains affiliate links, I may earn a commission when you make a purchase of qualifying items through any of those links.
Hope you enjoy this quilt tutorial. Happy Sewing.
Yoan 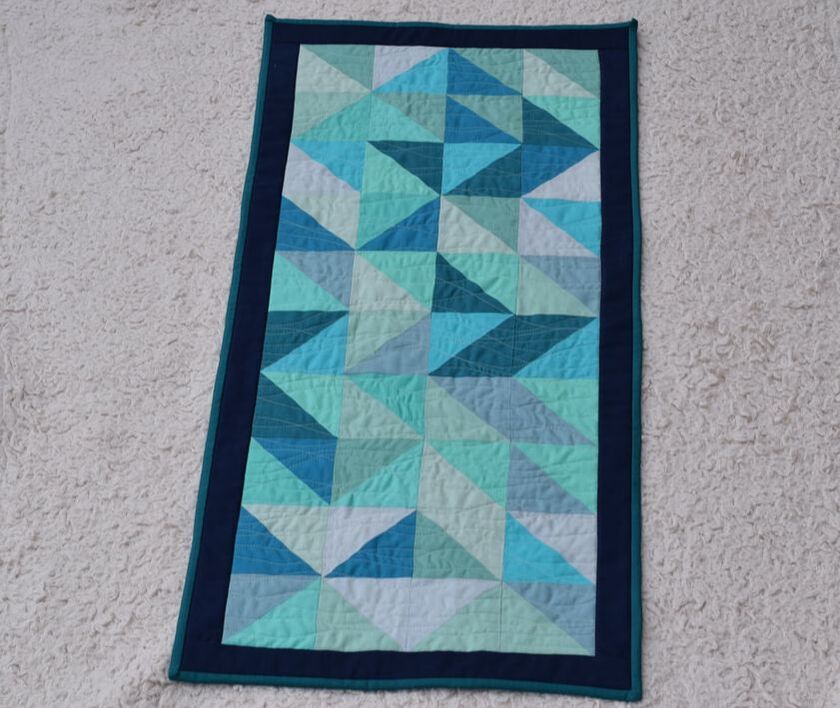
"Surprise Me" quilt wall hanging by Yoan Sewing Studio
The surprise me quilt wall hanging is an express and quite exciting charm pack project. There is no particular layout for the half square triangles blocks, hence each quilt would be unique and one of a kind.
Finished quilt measurements : Approx. 17 1/2" x 38 1/2" (44 x 96.8 cm)
This post may contain affiliate links. I earn a small percentage of commission when you make a purchase of qualifying items through any of these links with no additional charge. Thank you for your support.
Please enjoy, and happy quilting.
Yoan 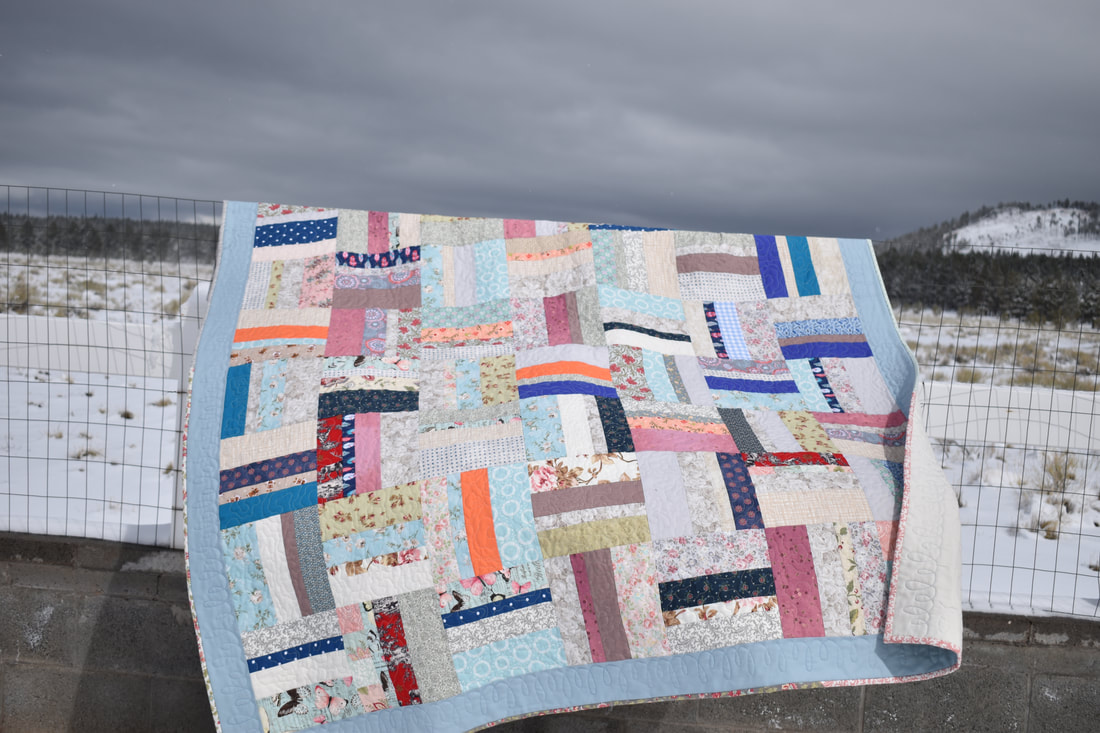
Spring Casserole Quilt by Yoan Sewing Studio
I'm so pleased to share another exciting scrap busting quilt project with you today. The spring casserole quilt is a rail fence style quilt that is relatively simple, yet very delightful and satisfying to make.
With this quilt, I mixed and matched lots of scraps, some are my favorites, some aren't; some are from high quality premium quilting fabrics, some are budget fabrics from chain stores; yet they all come together wonderfully. Finished quilt measurements : Approx. 62.5" x 70.5" (158.7 x 179 cm)
This post contains affiliate links; I may earn a small percentage of commission when you make a purchase of qualifying items through any of these links with no additional charge. Thank you for your support.
I hope you enjoy this quilt project. Happy sewing.
Yoan. 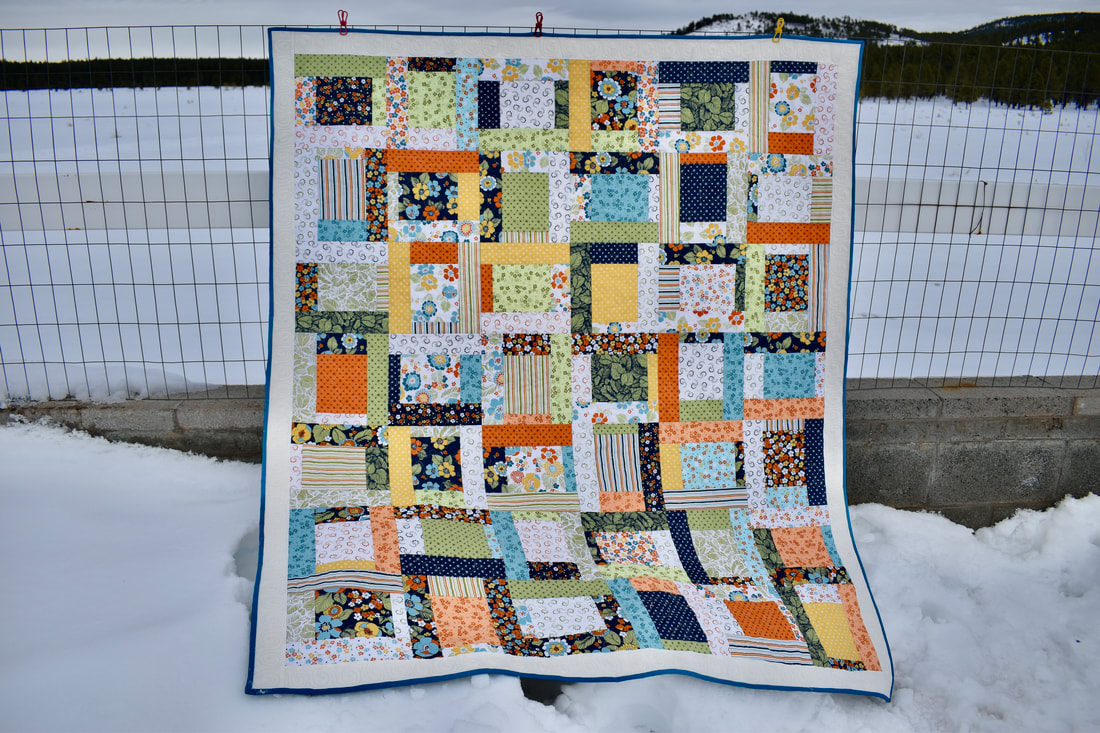
Five-Slice Layer Cake Quilt by Yoan Sewing Studio
Here's a new modern layer cake quilt pattern that I am so excited to share with you.
This quilt is super fun and relatively easy to make, and will make an express quilt top. The finished measurements of this quilt are approx. 55 1/2" x 64", and for this quilt you will need a full set of layer cake.
For this quilt, I used the Carnaby Street by Maywood Studio layer cake set, that I purchased from an Etsy shop.
Disclaimer : This post may contain affiliate links; I may receive a small percentage of commission when you make a purchase through any of those links. Thank you for your support.
Watch the full video tutorial on my Youtube channel.
Happy Quilting!
Yoan |
Categories
All
©
Yoan Sewing Studio | All Rights Reserved
Archives
March 2024
|
 RSS Feed