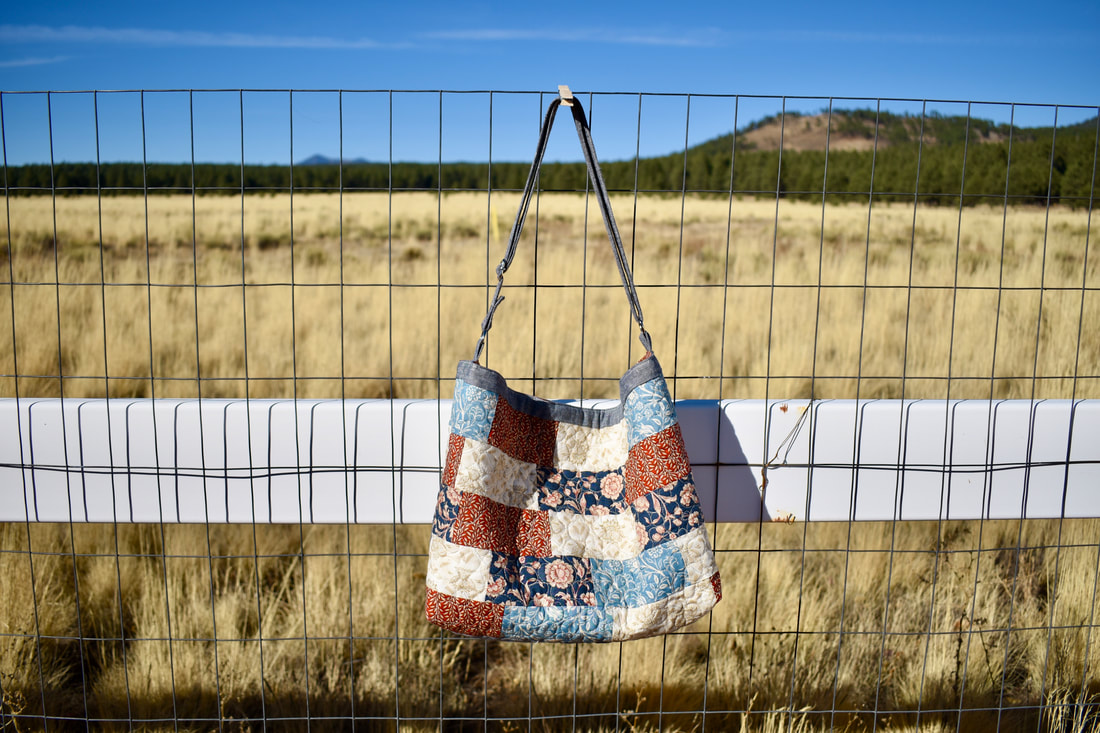
The Scrappy Slouch Bag - Front
Got some Jelly Roll Strips left over from your quilting project? How about making this charming slouch tote that is so much fun and pretty simple to make.
The finished measurement of this bag when lays flat is about 16" (widest point)x 11" although when you wear it, the center is going to collapse, hence gives you that attractive slouchy look. I used cotton batting for this bag, although other type of interfacing such as fusible fleece, thermolam, or felt fabric will work great as well. 
The Scrappy Slouch Bag - Back
This bag comes with 4 interior pockets (3 slip pockets and 1 zipper pocket), adjustable strap, and magnetic snap closure.
For this project I use these lovely Jelly Roll Strips by French General from Moda Fabrics.
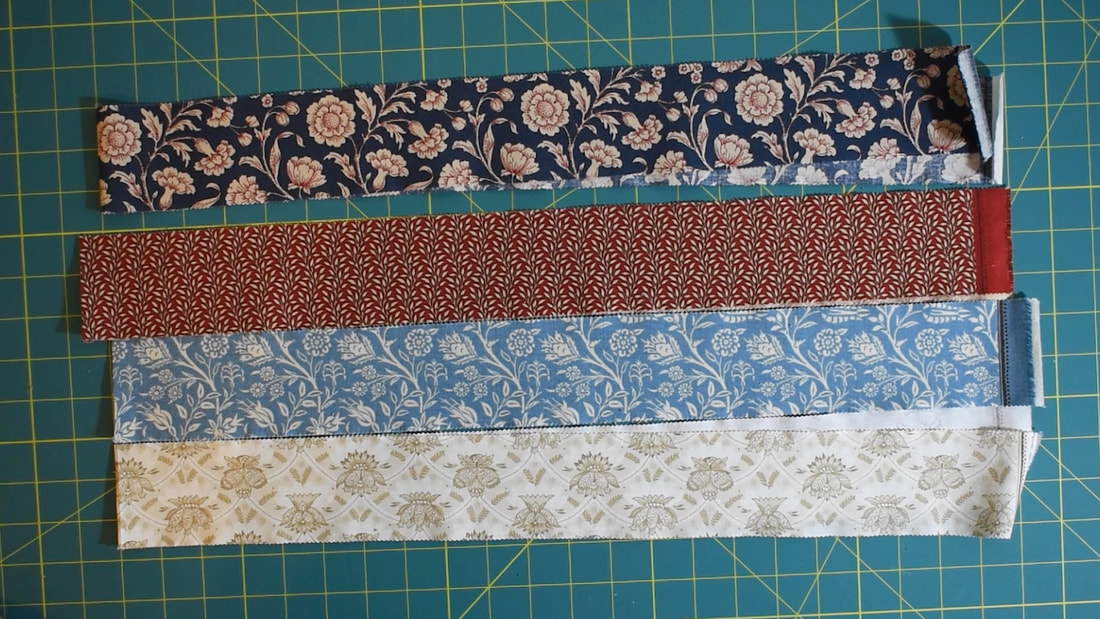
From each Jelly Roll fabric, you will need to cut 10" x 2.5" (2x) strips and 5" x 2.5 (4x) strips

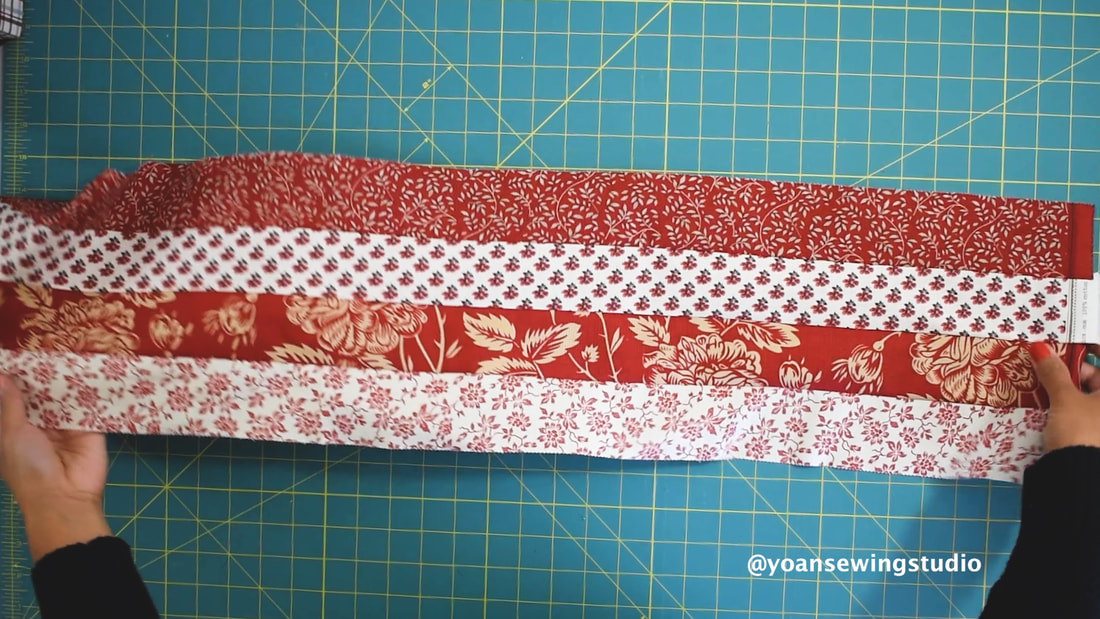
Below is the lay out of the front and back exterior shells
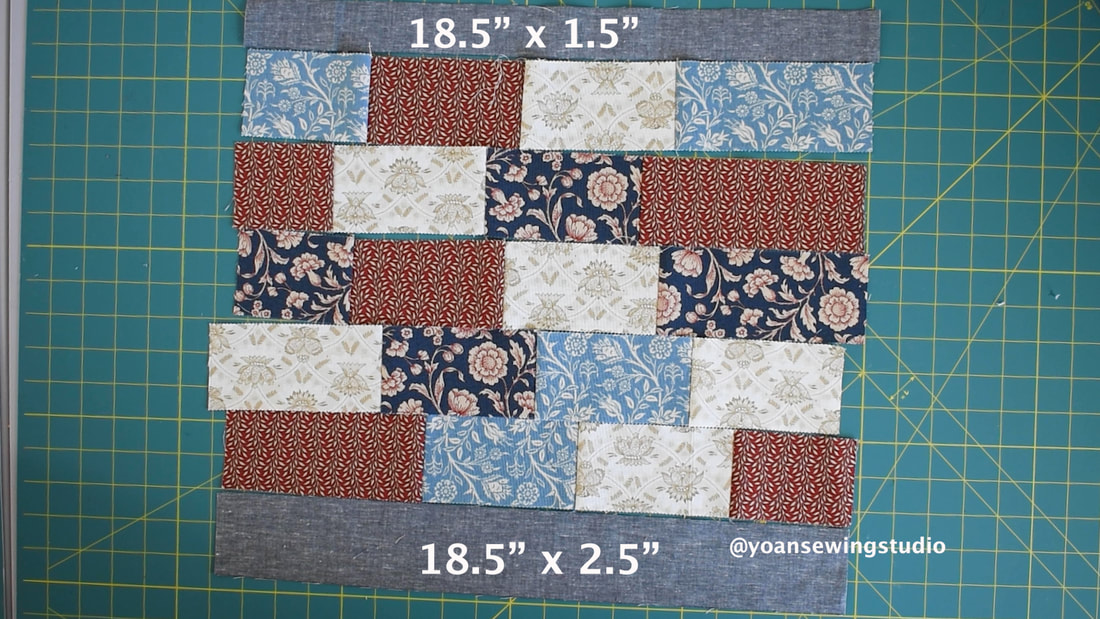
Front Exterior Shell Patchwork Layout
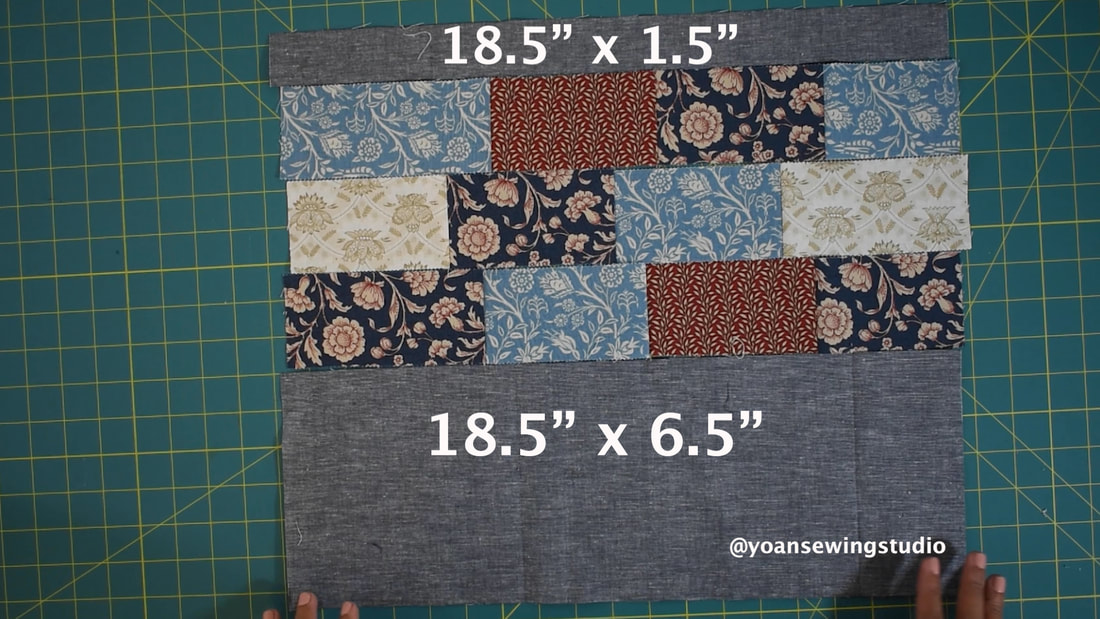
Back Exterior Shell Patchwork Layout
You can watch the full tutorial on my Youtube channel for the detailed patchwork piecing and the construction of the bag.
Supplies
4x jelly Roll Strips (2.5" wide strips) 1/3 yard of accent fabric (for the accent strips and strap Quilt batting (or interfacing of your choice e.g. fusible fleece, felt fabric, etc) 5/8" quilt weight fabric for the lining, slip pockets, and zipper pocket Nylon coil zipper (at least 7") 1" D rings (2x) 1" adjuster slider Fusible woven interfacing (pellon shapeflex 101) Basic sewing notions Disclaimer : Some of the links in this post are affiliate links. ================================================ Cutting The Jelly Roll strips patchwork From each Jelly Roll Strip, cut the following -10" x 2.5" (2x) -5" x 2.5" (4x) From the accent fabric cut the following ~Front Exterior~ Top Accent : 18.5" x 1.5" Bottom Accent : 18.5" x 2.5" ~Back Exterior~ Top Accent : 18.5" x 1.5" Bottom Accent : 18.5" x 6.5" ***After quilting/ applying the interfacing, trim off both sides of the front and back exterior shell about 1/4", thus both of your front and back exterior should be measuring 18" x 13.5" Strap Anchors : 5" x 4" Strap : 42" (cut from the full width of fabric) x 4" Strap interfacing : 41" (1" shorter from the length of the strap) x 2" Lining : 18" x 13.5" (cut 2x) Slip Pockets : 18" x 7" (cut 2x) Zipper Pockets : 9" x 7" Thank you for stopping by and Happy Sewing!
2 Comments
Patchwork double zipper purse by Yoan Sewing Studio
This patchwork double zipper purse is a practical and functional little purse that is sew-much-fun to make (pun intended).
It comes with 3 external pockets, and two internal pockets, and of course a zipper pocket. The finished measurement of this bag is about 9 1/2" x 10 1/2", a nice size to carry your necessities from wallet, phone, make up, sunglasses, etc.
For the patchwork you will need 2 1/2" squares in 3 different colors. This is a great way to use up some of those scraps, or leftover fabric, you can also use some fabric strips (jelly roll) one strip for each color will suffice for the patchwork.
I posted the full tutorial on my Youtube channel, go ahead and check that out, and consider subscribing so you won't miss any upload
Supplies
45 pcs of 2.5" squares -Fabric A 14 pcs -Fabric B 16 pcs -Fabric C 15 pcs 1/3 yard of quilt weight fabric for the back exterior and strap 2/3 yard of quilt weight fabric for the lining 2 nylon coil zippers (at least 11" long) Fusible woven interfacing (pellon shapeflex 101) Fusible fleece *or use your favorite kind of interfacing :) 1" D- rings (2x) 1" adjuster slider (1x) 1" swivel hooks (2x) Basic sewing notions Disclosure : Some of the links above are affiliate links, thank you for your support! ============================================== Cutting FRONT EXTERIOR -Lay out the patchwork as shown on the video 01:28 Front exterior interfacing -Fusible woven interfacing Upper part 10 1/2" x 2 1/2" (cut 1x) Lower part 10 1/2" x 8 1/2" (cut 1x) -Fusible fleece Upper part 10 1/2" x 1 1/2" (cut 1x) Lower part 10 1/2" x 8" (cut 1x) -Front exterior pocket lining Lining 1 (for the lower part) 10 1/2" x 8 1/2" (cut 1x) Lining 2 **cut exactly the same as the exterior piece's measurements after installing the zipper (mine turned out to be 10 1/2" x 11 1/4", yours may vary depending on the width of your zipper BACK EXTERIOR Back exterior piece : Cut exactly the same size as your front exterior Fusible woven interfacing : Cut exactly the same size as your front exterior Fusible fleece : cut the same size as the fusible woven interfacing; trim off 1/2" from the length size to accommodate the zipper Back exterior pocket: Lay out the patchwork exactly the same as the lower part of the front exterior Back exterior pocket fusible woven interfacing 10 1/2" x 8 1/2" Back exterior pocket lining 10 1/2" x 8 1/2" LINING Lining fabric : Cut two exactly the same size as your front exterior piece Internal pockets : Cut two 10 1/2" x 7" STRAP Strap anchor 5" x 4" (cut 1x) Adjustable strap 60" x 4" (cut 1x) Adjustable strap fusible woven interfacing 59" x 2"
I hope you enjoy this tutorial, and Happy Sewing!!
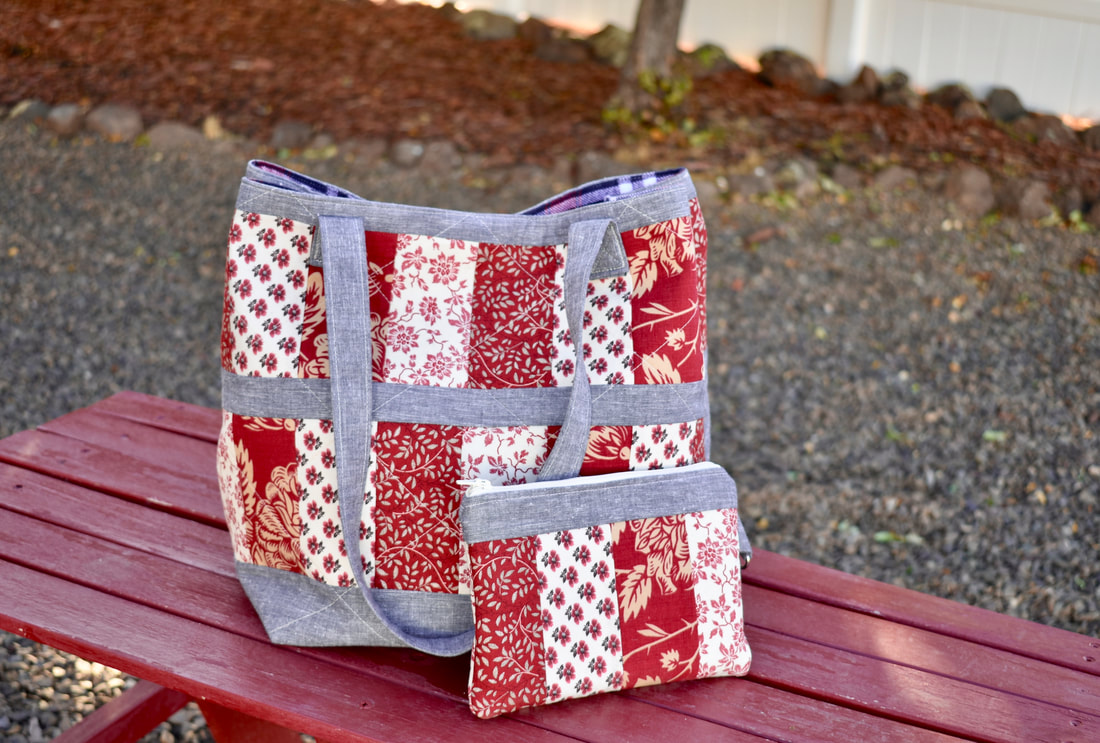
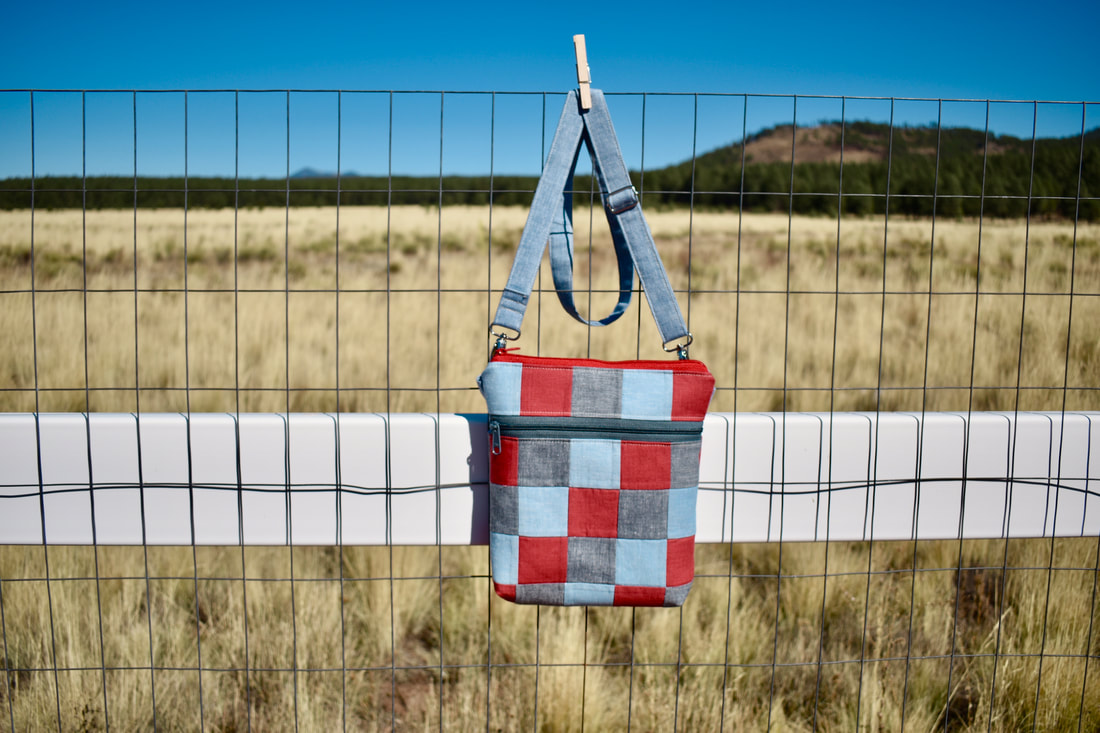
This is another fun project using the oh so versatile jelly roll strips. The Jelly Glee tote is a charming slouch tote with quite wide base hence looking bucket-ish. To make the most of the patchwork fabric, I also include a cute matching zipper pouch that is perfect to put your cellphone, case, cards, etc.
Supplies
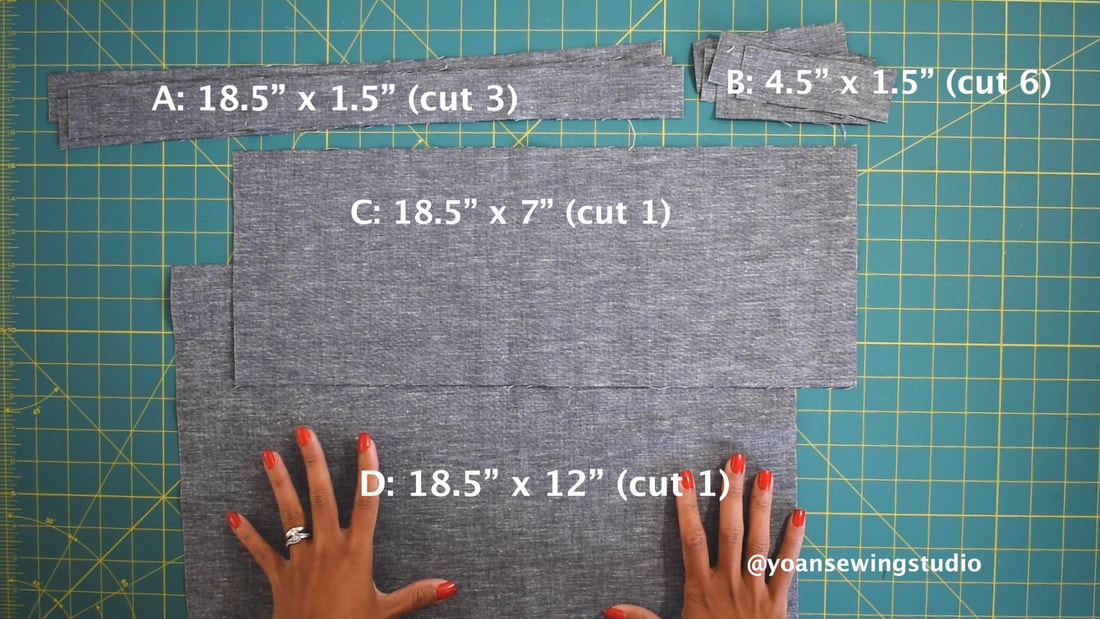
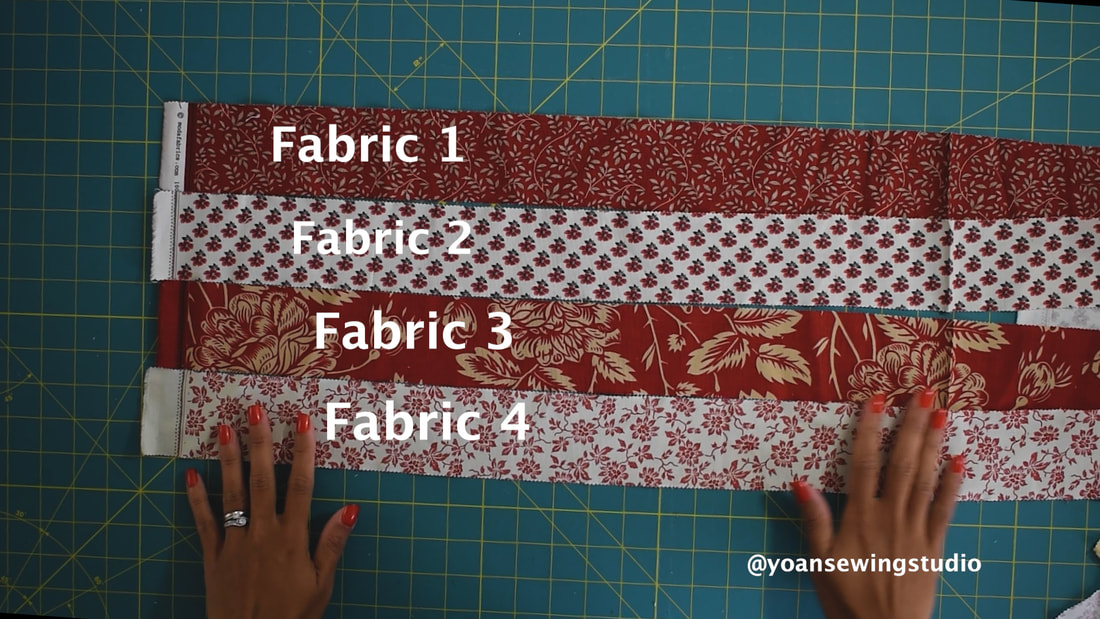
4 Jelly roll strips (2 1/2" strips) 3/4 yard main fabric Fusible woven interfacing (I use Pellon shape flex 101) Fusible Fleece (I use thermolam Pellon TP971F) 1 set of magnetic snap Nylon zipper (at least 7") - For the zipper pocket Nylon zipper at least 9" (for the pouch) Basic sewing notions Cutting Exterior Shell : See pictures below Interfacing : Cut two 18 1/2" x 17" (fusible woven interfacing) Cut two 18 1/2" x 16 1/2" (fusible fleece) Lining : Cut two 18 1/2" x 17" Slip Pockets : Cut two 10" x 7" Zipper pocket : Cut two 10" x 9" For the zipper pouch Exterior main : measure 5" from the left over jelly roll fabric and cut 2" (your fabric should measure 8 1/2" x 5") Exterior accent strip : 8 1/2" x 1 1/2" (cut two) Lining : 8 1/2" x 5" (cut two)
First thing first you will need to sew your Jelly roll strips together. I recommend to alternate the darker color from the lighter color, and of course you will need to sew them with 1/4" of seam allowance.
Measure 4 1/2" and cut, make 6x and you will end up with 6 rectangles measuring 8 1/2" x 4 1/2"

For the accent fabric you will need to cut as shown below
Then lay out the patchwork of the front and back exterior shell.
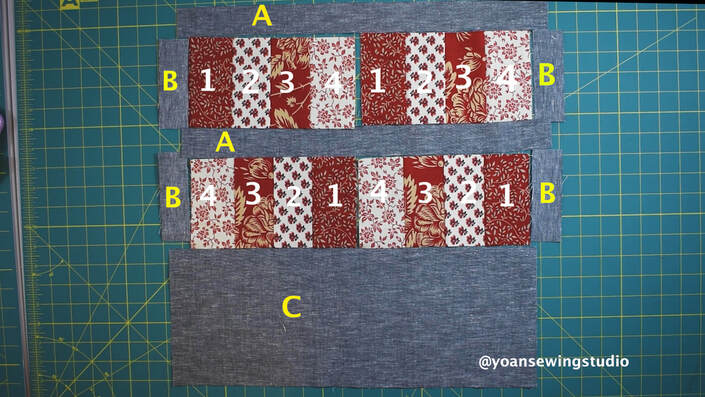
Patchwork layout front exterior
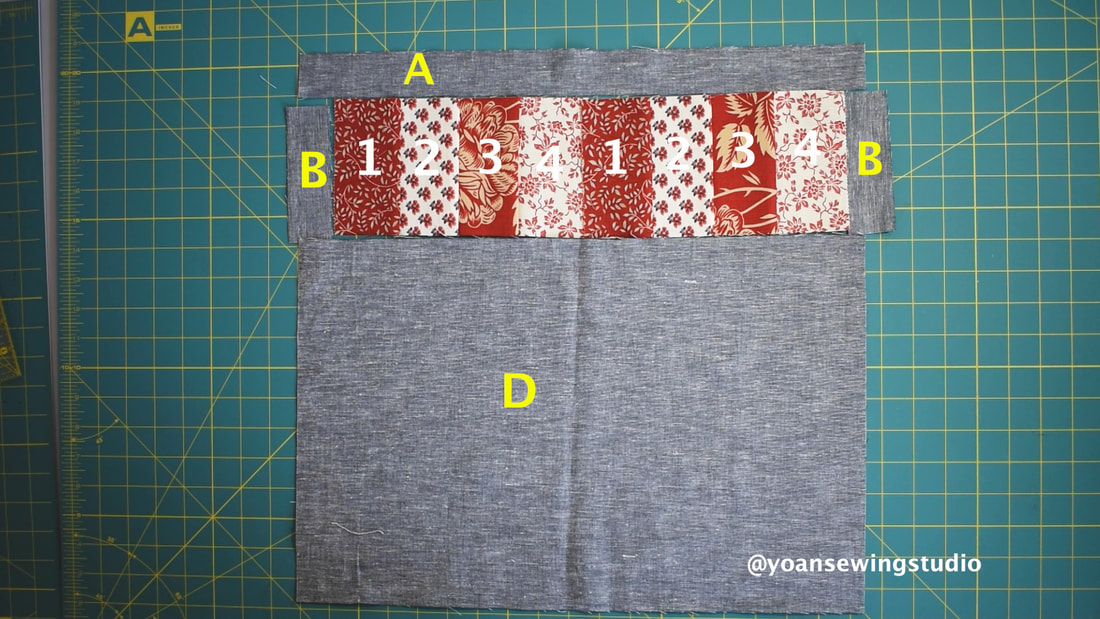
Patchwork layout Back Exterior
Piece your patchwork with 1/4" of seam allowance, and once you've done that go ahead and continue with the rest of the bag construction as shown in thevideo tutorial.
Once your bag is finished, you may go ahead and sew the zipper pouch. Disclaimer: This post contains affiliate links, thank you for your support! Happy Sewing!! 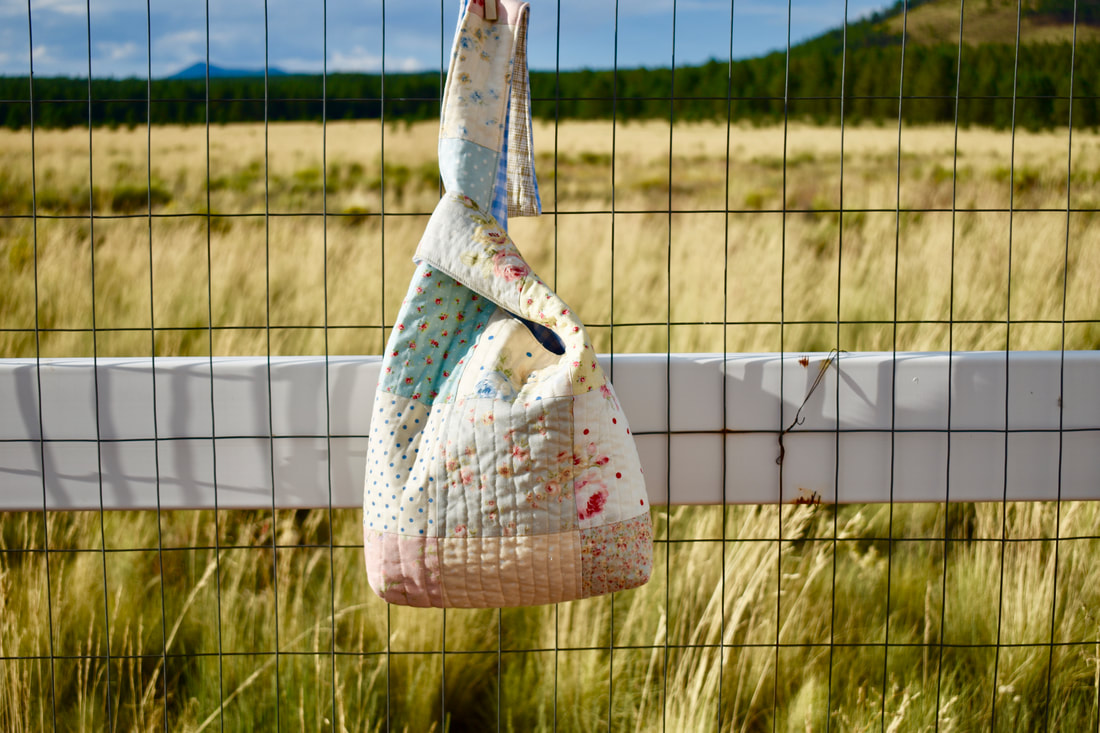
Japanese knot bag - Quilted version
This adorable Japanese knot bag will surely brighten up your day. Great for daily errands, coffee date, walk at the park, although this type of bag is pretty well known as the project bag.
The front exterior is made out of 14 pcs of charm packs (5" squares). Below is the diagram 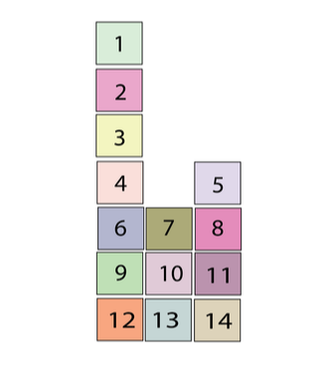
The Japanese knot bag patchwork diagram for the front exterior
I quilted this bag with left over quilt batting, and pretty pleased with the result, it gave enough body so my bag isn't too flimsy, yet still light weight to allow it to drape nicely.
You may watch the full tutorial on my Youtube channel (consider subscribing so you won't miss any upload ;)
Supplies and tools
14 x Charm Packs 5" squares 1/2 yard cotton fabric for the back exterior 5/6 yard cotton fabric for the lining Quilt Batting or lightweight interfacing or fusible fleece Basic sewing/quilting notions Curve Ruller (optional) Disclaimer : This Post contains affiliate links Happy sewing!!
If you are a quilter, the term "quilt as you go" might sound pretty familiar, and you probably have made a few project with that particular method, which simply means piecing the patchwork directly on the piece of batting.
I love using this technique to make small projects such as coaster (mug rug), placemat, table topper, and of course this adorable tote bag that I made using my favorite scraps. 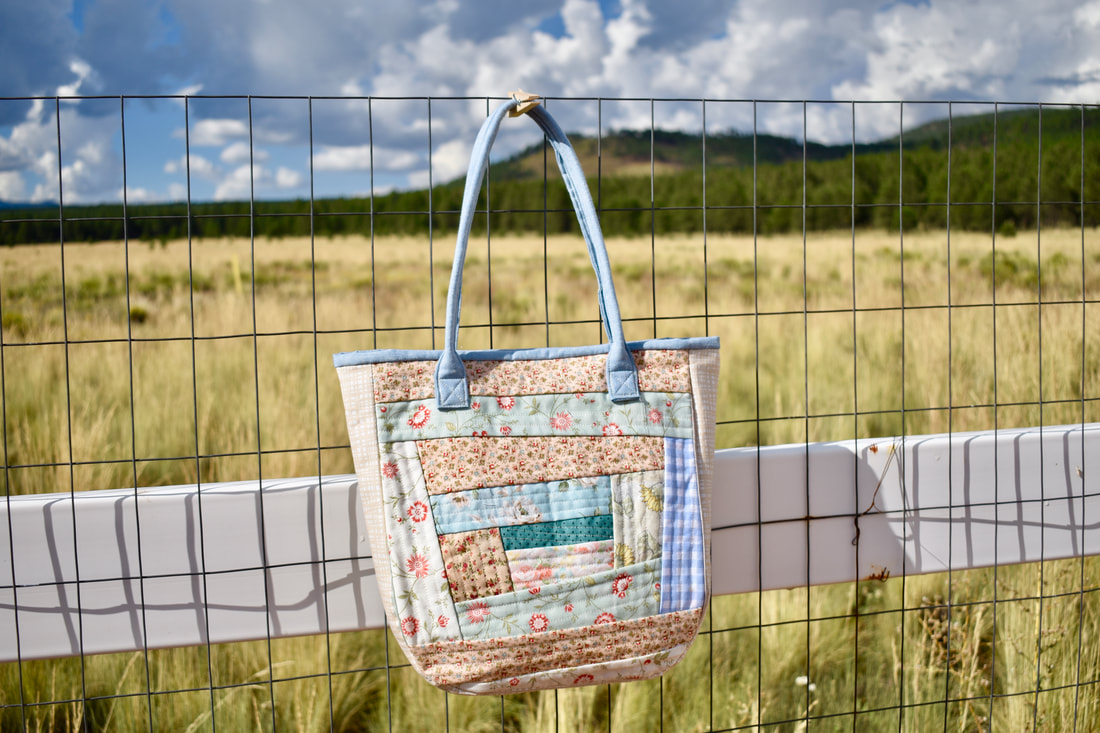
Scrappy tote bag made with "quilt as you go" technique
I posted the full tutorial of this project on my Youtube Channel, that you may watch below :
Click to set custom HTML
Supplies : - Assorted strips of fabric scraps - 2 x scraps of quilt batting (at least 13" x 13") - Backing fabric (optional) - 1/8 yard quilt weight fabric for the gusset - 1/4 yard quilt weight fabric for the handles and binding - Fusible fleece - 1/2 yard fabric for the bag interior (lining, lining gusset, and pocket) - 1 set of magnetic snap - Nylon Zipper (at least 6") ========================================= Measurements ~Exterior shell~ Front and back exterior : Make two blocks measuring 12" x 12" Gusset : Cut a strip of fabric 4" wide, and the length should be the same (or a bit longer) then the perimeter of the side and bottom exterior shell) Gusset interfacing: Cut a fusible fleece measuring 3" wide, the length should be the same as your gusset Straps : Cut two 24" x 4" Strap interfacing : Cut two from the fusible fleece 23" x 2" ~Interior~ Front and back interior : Cut two pieces the exact same as the front and back interior Gusset : Cut one strip the exact same measurement as the exterior gusset Slip pockets : Cut two 12" x 8" ZIpper Pocket : Cut two 9" x 7" If you have any questions please do not hesitate to leave me a comment below. Happy Sewing!! 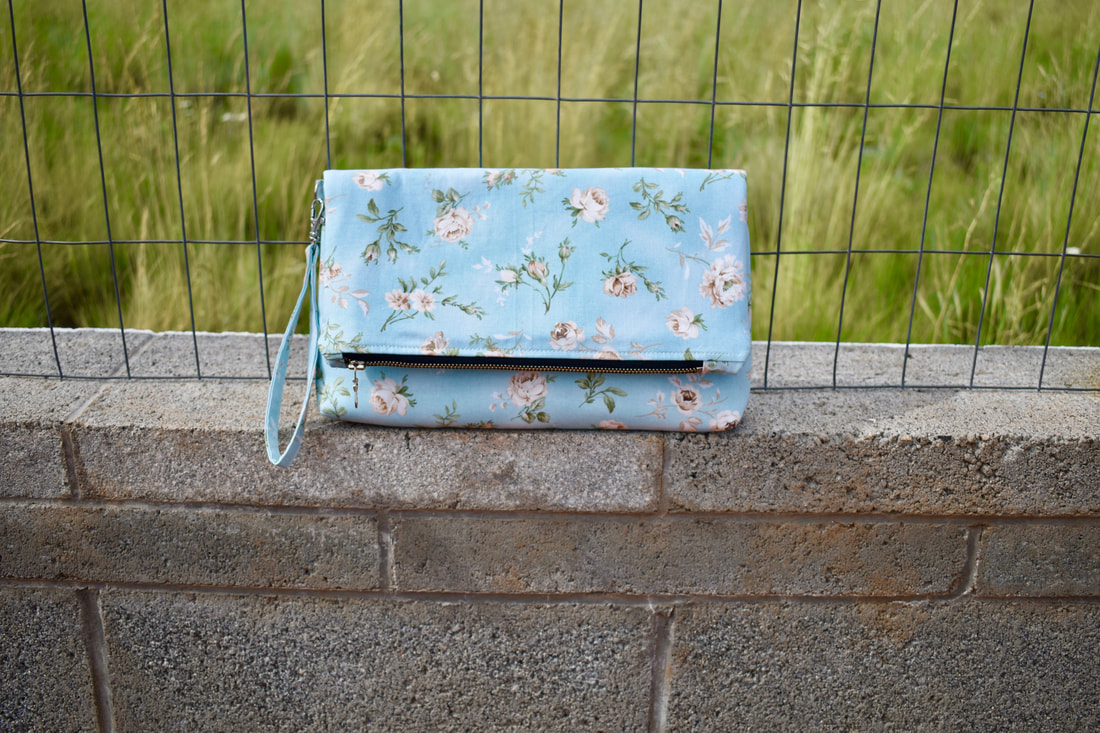
Foldover clutch purse with wristlet strap
Looking for a stylish clutch to go with your favorite outfit? Try making this foldover clutch purse that comes with metal zipper closure, a wristlet strap, and four card pockets to store your ID, driver's license, or credit card.
I have posted the full video tutorial on my Youtube Channel SUPPLIES 1/2 yard main fabric (I use quilt weight fabric) 1/2 yard lining fabric Fusible woven interfacing (I use pellon shapeflex 101) Fusible fleece 9" metal zipper 1/2" D-Ring 1/2" swivel hook CUTTING Exterior front and back Cut two 14" x 14" from the main fabric Cut two 14" x 14" from the fusible woven interfacing Cut two 14" x 14" from the fusible fleece (trim the upper top part 1/2" as instructed in video) Lining : Cut two 14" x 14" from the lining fabric Card pocket : Cut one 8" x 11" from the lining fabric Card pocket lining : Cut one 8" x 4" from the lining fabric Strap anchor : Cut one 2" x 2" from the main fabric Wristlet strap Cut one 13" x 2" from the main fabric Wristlet strap interfacing Cut one 13" x 1" Disclaimer : This post contains affiliate links If you have any questions please do not hesitate to reach out to me. Happy Sewing!! 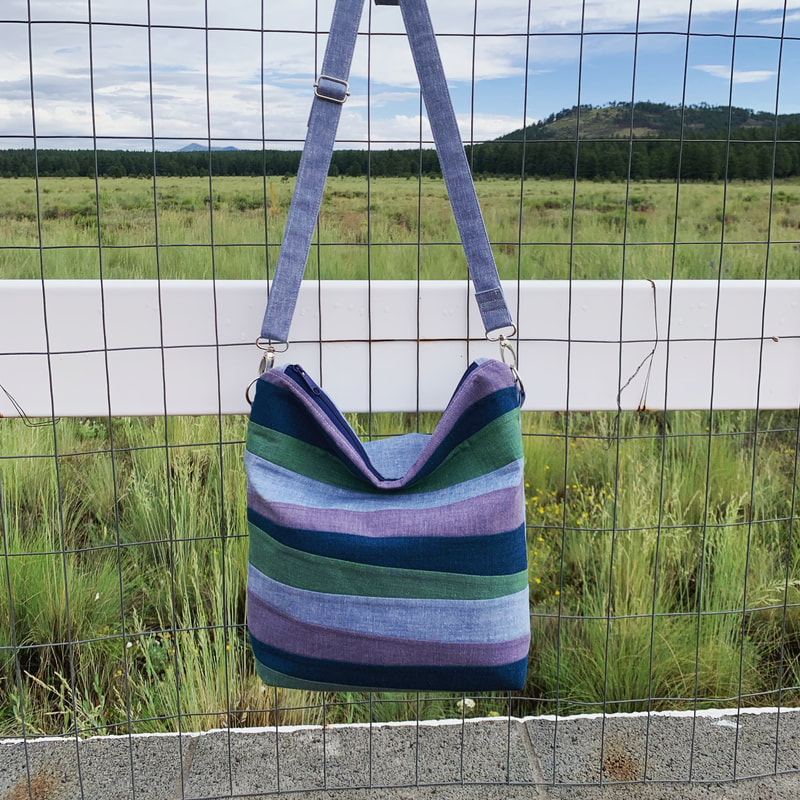
The Peony Slouch Bag
The Improv slouch zipper bag, is a fun, yet stylish bag that is so much fun to sew. This is a great project to use up some of your scraps or left over jelly roll strips from your stash. You may experiment with different color range, use solid or prints, totally up to you.
The construction of this bag is similar to the Marion bag that I posted a month ago, however since this bag is larger in size, the finished look is quite different than the Marion bag (this bag has more slouch look). Watch the full video tutorial on my Youtube channel
The Peony Slouch Zipper Bag Supplies and measurement :
Supplies : Assorted quilt weight fabric strips (refer to measurements in the cutting instruction below) 2/3 yard lining fabric Nylon Zipper (at least 15" long) 1" D rings (2x) 1" Lobster clasp swivel hooks (2x) 1" adjuster slider Fusible Fleece Fusible woven interfacing (pellon shapeflex 101) Basing sewing notions ============================================== Cutting ~Front Exterior~ Cut 13-15 pcs of 18" x 2 1/2" strips ~Back Exterior~ Cut one 18" x 9" Cut one 18" x 12" ~Interfacing~ Cut two 15" x 15" fusible woven interfacing Cut two 15" x 14 1/2" fusible fleece ~Lining~ Cut two 15" x 15" from the lining fabric ~Pockets ~ Cut two 15" x 8" from the lining fabric ~Strap Anchor~ Cut one 5" x 4" ~Strap~ Cut one 60" (or desired length) x 4" strips ~Strap interfacing~ Cut one 59" (1" shorter than the length of your strap) x 2" ~Zipper Tabs~ Cut two 4"x width of zipper (fabric and interfacing) If you have any questions about this project please do not hesitate to reach out to me. Happy Sewing!!
The Olivia quilted patchwork tote bag is such a darling bag that will surely brighten up your day. This bag comes with 2 exterior pockets, and four interior pockets.
The patchwork of this bag is made out of charm packs (5" squares), and you will need 16 pcs only. If you have some charm packs perhaps leftover from previous project, you can pull them out, or simply purchase a fresh new one from your favorite fabric line. Check out the fulll tutorial on my YouTube channel and consider subscribing so you won't miss any future upload.
Finished tote bag measurements :
Approx : 15" x 14" x 4" Supplies 16 charm packs (5" squares) 7/8 yard accent fabric (fabric C) 1/2 yard lining fabric Quilt batting (or interfacing of your choice) 1/4 yard backing fabric if using quilt batting(use cheap fabric, muslin, or scraps) fusible woven interfacing (I used pellon SF101) nylon zipper (at least 8") 4 D rings (1") 1 set of magnetic snap
Cutting measurements
~Exterior~ To make the block : Cut the charm packs into 3 1/2" x 5" (fabric A) and 1 1/2" x 5" (Fabric B) Exterior Top From Fabric C cut two 16 1/2" x 2 1/2" Exterior bottom From Fabric C cut two 16 1/2" x 9 1/2" Pocket Binding : Cut 2 1/2" wide strip for the binding
~Interior~
Facing From fabric C cut two 16 1/2" x 3" Lining From lining fabric cut two 16 1/2" x 13 1/2" Zipper pocket : From the lining fabric cut two 11" x 9" Slip Pocket From the lining fabric cut two 16 1/2" x 8" Straps From Fabric C cut two 22" x 4" Straps interfacing From the fusible interfacing cut two 21" x 2" Strap anchors From fabric C cut four 4" x 4" Disclaimer : This post contains affiliate links
Happy sewing!!
The Sunny Days backpack is a charming and modern looking backpack that is pretty simple in construction yet so much fun to make. This backpack features exterior pockets and 4 internal pocket (including one zipper pocket). The whole exterior piece of this backpack is quilted with quilt batting and quilt backing, although you can obviously use interfacing of your choice. Check out the full tutorial on my Youtube channel below. Happy Sewing!! XOXO 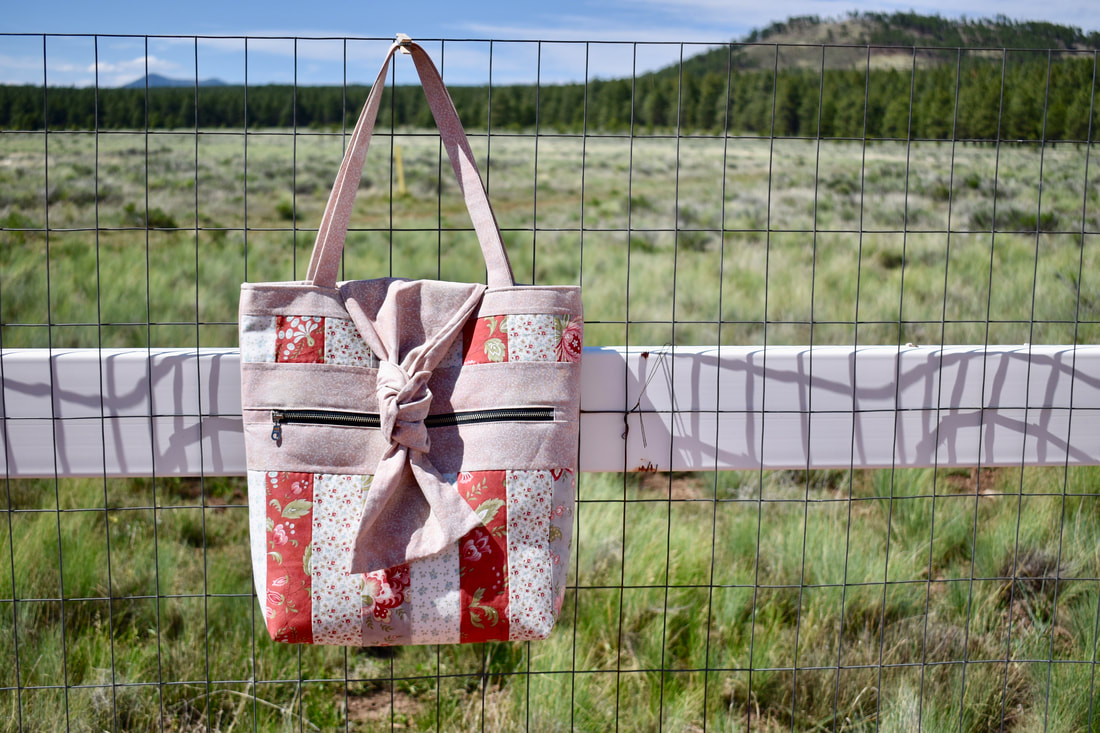
Naomi Tote Bag
The Naomi Tote bag is a large patchwork tote bag featuring front zipper pocket, and a cute knotted front flap. The use of the metal zipper really elevate the look of this bag (although you can also use nylon zipper). You can take this darling bag to work, party or any social gatherings, or roaming the town doing your errands.
This is a fun bag for you to make using some of the jelly roll strips from your stash. The finished measurement go this bag is about 15" x 14". Before you get started, go ahead and download the pattern layout and cutting instruction below:
Once you've downloaded the pattern, watch the full tutorial on my Youtube channel :
Supplies
4 Jelly Roll (2 1/2”) Strips 1 Yard accent fabric 1/2 yard interior lining fabric Fusible woven interfacing Fusible Fleece 12” metal zipper 1 set of magnetic snap Basic sewing notions
Happy Sewing!!
|
Categories
All
©
Yoan Sewing Studio | All Rights Reserved
|
 RSS Feed